
A TDD rake based build-system for multi-targeting Arm Cortex-M - using the teensy 3.6 as an example
Learn how to create modular code for embedded systems using a Test Driven Development approach
Intro and background
Want to dig deeper into developing with Arm Cortex MCUs? Interested in seeing how embedded systems are tested or developing some TDD skills for Arduino projects? Have a go at this tutorial!
We at sunEtrike have big dreams for our software development. While I did take one CompSci course during my first year of college/uni, beyond that I’ve had to learn everything else as I went.
One of the things I hated most about coding was tracking down bugs. For us to one day grow into a professional software team, we have to have strong systems in place for catching bugs and ensuring quality.
Test Driven Development has gone up and down of favour over the years but I think by now it’s well understood in the industry understands that code needs to be well tested before it goes out to users.
An automated testing suite is a very important piece of that process, especially for devops oriented teams. With this tutorial, I have finally managed to combine my learnings into a test suite that builds on a real board.
What are you getting out of completing this tutorial/exercise? A modularized TDD example of blinky using minimalist tools
This article will build for the open source teensy3.6.
Then in the follow on article we will add the FRDM-KL25Z a development board by NXG with lots of interesting peripherals included. The FRDM SDK is more low level compared to the teensy so that one will be shorter but more technical.
This tutorial may be worthwhile for you to try if:
-
You are an Arduino developer who hasn’t yet built an app outside of a single file Arduino sketch and are interested in upping your coding skills and learning how to use TDD to make your code more modular and portable.
-
You are a TDD-inclined Ruby developer interested in getting into embedded systems and IoT.
At the end of this tutorial, You will have a test driven version of the blinky module that often plays the role of Hello World for embedded systems/Arduino projects.
Basically, this article is my attempt to distill what I’ve learned about embedded testing to date and hopefully give a starting point to anybody who is interested in trying automated testing/Test Driven Development (TDD) within the world of open-source & embedded systems.
You can browse the github repo to have a look. It is a Rake based build using Unity as the testing framework. After getting the toolchain set-up, we’ll use TDD to refactor teensy’s starter blinky code into its own module and add an abstraction layer to the interface.
This Rakefile was developed and tested using a Linux system and GCC11. I am pretty rusty with Windows these days but I realize it’s still super common for embedded systems developer to use Windows so don’t worry if that’s you. Here’s an NXP tutorial for setting up the GCC toolchain on Windows via MingW. Alternatively, if you dont have Linux on your CPU you can also try Windows Subsystem Linux
Why bother with automated testing for embedded systems?
I’m a big fan of automated testing. As somebody who is always juggling a lot of balls in the air. It gives me a lot of comfort to revisit an area of my codebase that I haven’t seen in 6-8 months and allow the tests to remind me how it works.
Dual-targeting and even multi-targeting
There has been a lot of news lately about a global shortage in microcontrollers and semiconductors. So the ability to write an embedded application that can build on multiple devices may mean the difference of whether or not your protoypes make it into production. TDD forces you to decouple your application layer from the underlying hardware which, generally makes for better portability to other devices & systems.
SOLID, Flexible, and Testable Designs
The term ‘spaghetti code’ gets thrown around a lot in the software world. Codebases that have long, complicated functions, nested ifs, etc can become a nightmare to tweak & maintain over time. As a codebase progresses and matures, these types of interwoven dependencies can significantly slow down progress and new releases.
One of the main benefits of TDD is the way it forces you to think about the design and structures of your code. Grenning identifies the SOLID framework, originally attributed to “Uncle” Bob Martin in “Agile Software Development: Principles, Patterns, and Practices”.
The C-language is not object oriented which means that these principles are implemented at the module level.
There are plenty of articles on the internet which describe SOLID in different contexts so I’m only going to briefly describe how I understand these principles to apply to the embedded context.
-
S Single Responsibility Principle - The name says it all here; a module should have one job. This often leads to very descriptive module names. A module called LEDdriver.c is expected to turn the LEDs on and off.
-
O Open-Closed Principle - ‘Open for extension, Closed for modification’. For example, The LedDriver.c module may leverage a separate BaseLedDriver.c module in order to trigger the specific actions for the teensy. If you now want to add support for a new device (Netduino, for example), You would create a NetduinoLedDriver.c which also calls BaseLedDriver. Both devices would then interact with the rest of the application in the same way even if their underlying implementations are different. As a developer, you do not need to modify BaseLedDriver.c to add a new target board. We will dig into this when we abstract our teensy code to handle a second device.
-
L Liskov Substitution Principle - In the LEDdriver example, you might create a data structure that encompasses the basic information of an LedDriver. This is what permits you to substitute in a mock interface during testing. By doing this, any other module (an LedScheduler.c, for example) that wants to trigger an Led, will use the same function call. The calling module does not care about the implemenation details.
-
I Interface Segregation Principle - The interface of a module should be limited to a single concept. An LedDriver.c is basically a light-switch. It wouldn’t make sense for you to check the time by looking at a light switch. Time and Light “Status” are very different concepts. If you find yourself asking about both of those concepts within the same interface, function call, etc) Then the interfae of your module is probably not well segregated.
-
D Dependency Inversion Principle - Dependencies between modules create problems both for testing and for changing over time. It’s can be very challenging to debug embedded systems especially since the physical world can do something unexpected (up to and including cosmically-induced bit-flips) which suddenly place the device in no man’s land as far as your code is concerned. While these issues will always challenge even the most battle-hardened software vets who are operating down near the bare-metal, the ability to reduce dependencies can help to simplify the problem of how to escape from an unknown state-space.
Putting this into practice in testing will often involve turning your module into a ‘black-box’. Where the caller makes an abstracted call such as ‘is Led #5 on?’ or ‘turn the blue led off’. The internal details of how the serving module makes that call is hidden from the caller. In embedded TDD, function pointers are often used in order to allow testing of these abstracted interfaces.
Where I found big challenges in learning automated testing for embedded systems
As I’ve been diving deeper into the world of embedded systems and mirocontrollers, I wanted to make sure that I had a handle on how to apply TDD in the world of C cross-compiling. So I picked up copy of James Grenning’s book TDD for Embedded Systems. Among the two testing frameworks he demonstrated, I preferred Unity this is mainly because I am still a relative novice in C and I’d prefer to avoid mixing languages at this time. The other option CppUTest is written in C++.
One complication to this is that the library supplied by the teensy is a mix of c & C++. Even in this tutorial we will encounter a C++ module and learn how to deal with it from our application code.
As a relative novice in c-programming, just getting Grenning’s examples to build took a pretty big effort. Eventually I got through and voila, my reward was a suite of passing tests that could NOT be built on any particular device. While it makes sense within the scope of his book, I found myself floundering a bit in trying to figure out how to get this well-tested & decoupled book code to deploy onto an actual device.
Embedded TDD tries to offer its practitioner the promise of development without hardware. It’s an attractive but rather lofty goal for a small team. At the end of the day, if well-tested code doesn’t perform as expected on the board, then the whole effort is wasted.
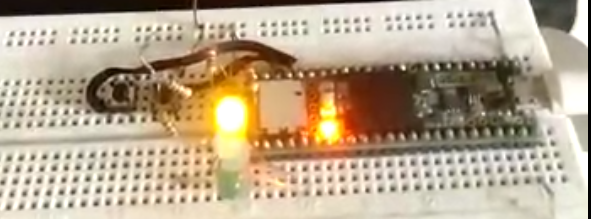
The open-source Teensy boards serve as a good starting point for Arduino developers learning how to get into ARM Cortex.
The Teensyduino package contains a starter makefile and blinky source code. To ensure the necessary toolchain is set-up on your computer, please make sure you can build and run it before attempting to use this code.
Rake vs Make for embedded development
Slowly but surely, I’m learning to navigate makefiles, they are quite cryptic to read and learn but I as far as I can tell, they are still pretty much industry standard. From a TDD & multitargeting perspective, they suffer from a couple important drawbacks:
- They are a domain-specific language that is super hard to read for the uninitiated
- They don’t have a way to test and protect against regressions Most important
While scripting languages often suffer speed wise, in this case, I feel that having a fully object-oriented language more than makes up for it and I’m very fond of RSpec for its expressiveness and readability. As the ruby version of Make, Rake does a lot of the heavy lifting for us on this job. If you are curious to learn more about Rake, I pulled a lot from this blog while learning how rake handle dependencies and filetypes. I leaned heavily on ElectronVector’s blog post on using rake to drive GCC. This example is basically a TDD version of that rakefile.
Unity provides a starter rakefile without a test harness. It works well but in order for me to put a test harness around it, I needed to extract it to a class.
Getting started
To get started, let’s take an inventory of what we have to work with.
If you mainly use arduino studio you may not have used make very much
Getting your toolchain in place
- The makefile and starter source code can be found at Teensyduino. For my Teensy 3.6, the makefile is located at hardware/teensy/avr/cores/teensy3. If you have a Teensy4, it will be at cores/teensy4 and so on.
IMPORTANT: Make sure your computer’s teensy buildchain is correctly setup by running make within this folder and seeing blinky running on your device. Windows users can get make by installing MingW (core, C++ & msys) which has a helpful little walkthrough for embedded developers here. If you prefer a package manager, there is also a Chocolatey package
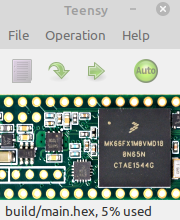
The teensy loader should pop-up automatically.
The programming status bar should pop-up as well.
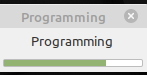
Keep an eye out for both of these as you are progressing through the test-suite
- The rakefile and starter source code within example 3 of Unity (located at examples/examples3). Make sure your computer’s ruby buildchain is correctly setup by running rake within this folder. Unity should report a couple tested modules; each with some successful, failed and ignored tests.
Setting up a new project
-
After cloning the teensy_tdd_rake repo, run
bundle installto set-up rake and rspec/ - Copy the teensy3 folder into the root folder
- Copy the unity.framework folder into the root folder. you may want to include it as a git submodule using
git submodule add https://github.com/ThrowTheSwitch/Unity
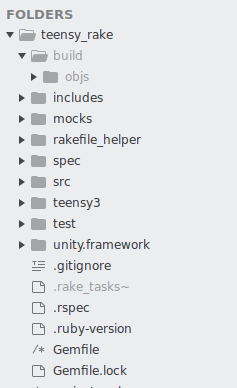
With that, you should now have the following folder tree:
To test the buildchain, We are going to run first run with teensy disconnected, then with it connected.
1. Disconnect the teensy and type
bundle exec rspec
It should return with XX examples and 1 failure. What’s the failure? Well, I’ve started you off on step 1 of the Red-Green-Refactor cycle. We’ll come back to the failed test a little later..
2. Connect the teensy and type
bundle exec rspec
If you are running on an ubuntu install, this may work immediately. However,
The Rakefile_helper will attempt identify if a device is connected at usb address /dev/ttyACM0 or /dev/ttyACM1. These are the default usb locations on both my Linux Mint & ArchLinux installs. If the addresses on your system are different you can update within the file system.yml.
If it identifies that a teensy is connected, it will run those tests, otherwise it will skip them. The teensy tests are a bit slow but it’s the best way I’ve found so far to do an outside-in test of the build.
If you’ve made it this far, congrats! You’ve now got an open-source, TDD build system for your teensy to get you going on your way towards TDD and/or multi-targetting.
Testing and Iterating
Regardless of what kind of software you are building, there will be some variation of a testing pyramid similar to the picture below. At the top are the ‘acceptance or feature’ tests which cover all of the important functionalities that your users expect to see. These are slow to run and require the physical hardware and probably customized bench & field testing programs. Writing these tests can help to clarify your thinking about what exactly you are expecting your software solution to achieve for your users.
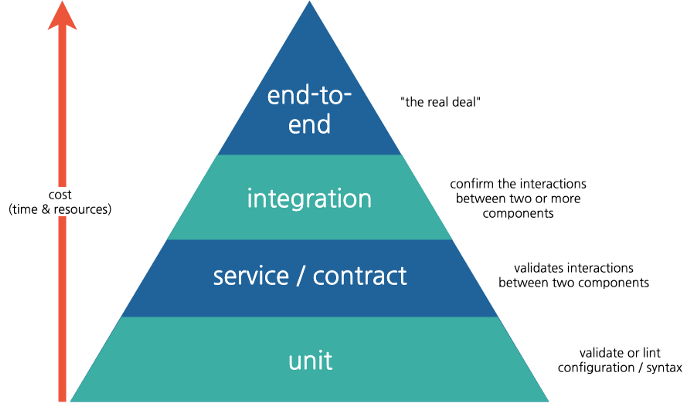
Note: this is not my picture. the source is here
In the case of our TDD build-system, our interface is the Rakefile. The following commands are defined:
For testing:
prepare_for_testsunit(the default, will run on the basicrakecommand)
For deployment:
deployLoads the binary to the target via USBprepare_binaryLinks the compiled source code and converts the binary into a hex ready for uploadbuild_maincompiles your application codebuild_targetcompiles all sources provided by the target into a static library that can be linked in at a later stage
Since the task ‘unit’ is the default, typing rake is equivalent to typing rake unit. Try it now if you need any convincing.
Before
Clearing build directory
Running unit tests
Running system tests...
The first build-system spec.
commit 9393d17
Pro tip: If you cloned the github project above, you can check your progress against these commit using git diff <commit_id> <filename>
For example. If you are working on the file src/LedController.c and cant seem to get the same result as me, try typing git diff 9393d17 src/LedController.c
Before going forward, let’s have a look at layout of the spec/ folder
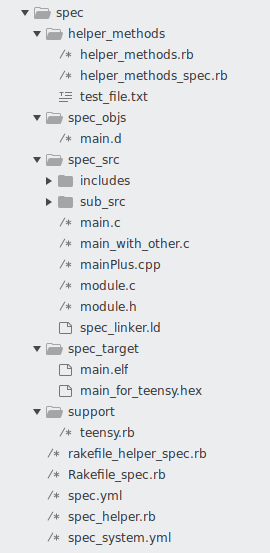
There are 3 files that defines specs:
- Rakefile_spec.rb - As mentioned above, this is the interface for our buildsystem.
- spec/rakefile_helper_spec.rb - All of the application logic and customization is found in here.
- spec/helper_methods/helper_methods_spec.rb - These are methods to assist in setting up and tearing down tests. They mostly perform string and file manipulation.
Let’s look again at the failing spec by hitting bundle exec rspec:
1) Rakefile defaults to unit tests
   Failure/Error: expect(check_for_file(target_exe_filepath)).to eq(true)

     expected: true
          got: false

     (compared using ==)

     Diff:
     @@ -1 +1 @@
     -true
     +false

   # ./spec/Rakefile_spec.rb:43:in `block (2 levels) in <top (required)>`
During this spec, Rspec was told to expect something to be true. Those instructions are located at /spec/Rakefile_spec.rb:43. Let’s have a look at that file & line. We see the offending spec:
it 'defaults to unit tests' do
	target_exe_filepath = build_folder + 'TestLedController.exe'
	`rake`

	expect(check_for_file(target_exe_filepath)).to eq(true)
end
In case you are not familiar with Ruby, here’s what the spec is requesting in plain english:
Expect to find a file named 'TestLedController.exe' inside of the build folder
You can check this page for more details about how Unity is built. For our purposes, we just need to know that the Unity build was triggered rather than the teensy build. But why did it fail? Well, this Rakefile instucts Unity to search in the test/ folder for files named TestSomeModule.c. There is no file like that so the test fails. We are Red, in the Red-Green-Refactor loop. Let’s create a blank file with the specified name TestLedController.c and try again
Clearing build directory
Running unit tests
Running system tests...

gcc -DUNITY_INCLUDE_DOUBLE -DUNITY_SUPPORT_TEST_CASES -D__MK66FX1M0__ -DF_CPU=48000000 -DTEST -c -m32 -Wall -Wno-address -pedantic -Isrc/ -Iunity.framework/src/ -Itest/ -Iincludes/ -Iteensy3/ -Imocks/ -Iteensy3/avr/ -Iteensy3/util/ build/TestLedController_Runner.c -obuild/TestLedController_Runner.o

gcc -DUNITY_INCLUDE_DOUBLE -DUNITY_SUPPORT_TEST_CASES -D__MK66FX1M0__ -DF_CPU=48000000 -DTEST -c -m32 -Wall -Wno-address -pedantic -Isrc/ -Iunity.framework/src/ -Itest/ -Iincludes/ -Iteensy3/ -Imocks/ -Iteensy3/avr/ -Iteensy3/util/ test/TestLedController.c -obuild/TestLedController.o

test/TestLedController.c:1: warning: ISO C forbids an empty translation unit [-Wpedantic]

gcc -lm -m32 build/TestLedController_Runner.o build/TestLedController.o -o build/TestLedController.exe
Rake successfully recognized the new file! Great! It began compiling its modules, first TestLedController_Runner.o and then TestLedController.o before exiting with an error. New information and new errors is progress in the TDD cycle.
Here’s the basic structure of a test in unity. Try adding it to the empty file to see what you get…
#include "unity.h"
#include "LedController.h"

void test_Led_Controller_does_a_thing_and_fails(void)
{
	TEST_FAIL_MESSAGE("Our greatest glory is not in never falling, but in rising every time we fall. - Confucius");
}
Clearing build directory
Running unit tests
Running system tests...
gcc -DUNITY_INCLUDE_DOUBLE -DUNITY_SUPPORT_TEST_CASES -D__MK66FX1M0__ -DF_CPU=48000000 -DTEST -c -m32 -Wall -Wno-address -pedantic -Isrc/ -Iunity.framework/src/ -Itest/ -Iincludes/ -Iteensy3/ -Imocks/ -Iteensy3/avr/ -Iteensy3/util/ unity.framework/src/unity.c -obuild/unity.o
gcc -DUNITY_INCLUDE_DOUBLE -DUNITY_SUPPORT_TEST_CASES -D__MK66FX1M0__ -DF_CPU=48000000 -DTEST -c -m32 -Wall -Wno-address -pedantic -Isrc/ -Iunity.framework/src/ -Itest/ -Iincludes/ -Iteensy3/ -Imocks/ -Iteensy3/avr/ -Iteensy3/util/ build/LedController_Runner.c -obuild/TestLedController_Runner.o
build/TestLedController_Runner.c:5:10: fatal error: LedController.h: No such file or directory
5 | #include "LedController.h"
| ^~~~~~~~~~~~~
compilation terminated.
rake aborted!Ok, this time it couldn’t find the header file. For those of you who are still getting used to the difference between source and header files. One way to think about it is that the header file defines the interface of the module. So this is a good time to revisit the concept of SOLID and think about what we want this LedController.c to do. Better yet, let’s evaluate how ‘SOLID’ the teensy starter code in main.cpp is.
SOLIDifying main.cpp
- S Single Responsibility Principle - What is the responsibility of main.cpp right now? Well, since it is the only file, it does everything. Even in this very simple application, there are multiple responsibilities involved.
- Start-up and initialize the board and name important variables
- Toggle an led ON or OFF
- Keep track of time and perform an action after a specified amount of time
-
O Open Closed Principle - Let’s say you want to add some new functionality, for example a different LED that flashes on a different interval. How would you do that? Would you extend main.cpp with new details or would you copy and paste the new pin number and interval into main.cpp? Certainly the easier thing to do is copy/paste main.cpp and that would work fine for this example. However, in that case you are not extending main.cpp and you are modifying it. So the easy/obvious route is offside of OCP.
-
L Liskov Substitution Principle - Liskov substitution principle (LSP) evaluates the interface. However as a single file monolith, main.cpp does not even have an interface! So from that perspective, adding an interface is the obvious step to take to make this application more SOLID with a capital ‘L’!
- I Interface Segregation Principle - So what interfaces do we need? Well based on the 3 repsonsibilities mentioned in section 1, it would appear that main needs 3 interfaces:
- For initialization and for establishing the important constant and variables needed by the application
- For reading and writing Led pins
- For monitoring time and taking action based on that information
- D Dependency Inversion Principle - Does the high level code (main.cpp) depend on the lower-level modules? Well, it depends on one interface: Arduino.h. What does Arduino depend on? Open the file and have a look:
#include "WProgram.h"
#include "pins_arduino.h"
pins_arduino.h is almost 300 lines of constant definitions while WProgram depends on 24 different modules.
If you are preparing to move from teensy to a different board (or vice-versa), be prepared for a LOT of reading, digging and research. I can personally attest to this. I learned a lot, but it can take a very long time. Nobody wants to be dealing with those sorts of challenges on a deadline.
That’s all a lot to take in but let’s take it step by step.
Adding a unity test
Defining the interface with TestLedController.c
Looking again at the starter sourcecode for blinky.
// src/main.cpp

#include <Arduino.h>

extern "C" int main(void)
{
	pinMode(13, OUTPUT);
	while (1) {
		digitalWriteFast(13, HIGH);
		delay(500);
		digitalWriteFast(13, LOW);
		delay(500);
	}
}
pinMode() makes teensy toggleable. So thats a good place to start. We want to be able to create an LedController with a pin number.
Let’s create the header now.
// includes/LedController.h

#ifndef D_LedController_H
#define D_LedController_H

#include <stdint.h>

void LedController_Create(uint16_t * pinNumber);

#endif
When we run the tests,
clearing build directory
Running unit tests
Running system tests...
gcc -DUNITY_INCLUDE_DOUBLE -DUNITY_SUPPORT_TEST_CASES -D__MK66FX1M0__ -DF_CPU=48000000 -DTEST -c -m32 -Wall -Wno-address -pedantic -Isrc/ -Iunity.framework/src/ -Itest/ -Iincludes/ -Iteensy3/ -Imocks/ -Iteensy3/avr/ -Iteensy3/util/ unity.framework/src/unity.c -obuild/unity.o
gcc -DUNITY_INCLUDE_DOUBLE -DUNITY_SUPPORT_TEST_CASES -D__MK66FX1M0__ -DF_CPU=48000000 -DTEST -c -m32 -Wall -Wno-address -pedantic -Isrc/ -Iunity.framework/src/ -Itest/ -Iincludes/ -Iteensy3/ -Imocks/ -Iteensy3/avr/ -Iteensy3/util/ build/TestLedController_Runner.c -obuild/TestLedController_Runner.o
gcc -DUNITY_INCLUDE_DOUBLE -DUNITY_SUPPORT_TEST_CASES -D__MK66FX1M0__ -DF_CPU=48000000 -DTEST -c -m32 -Wall -Wno-address -pedantic -Isrc/ -Iunity.framework/src/ -Itest/ -Iincludes/ -Iteensy3/ -Imocks/ -Iteensy3/avr/ -Iteensy3/util/ test/TestLedController.c -obuild/TestLedController.o
gcc -lm -m32 build/unity.o build/TestLedController_Runner.o build/TestLedController.o -o build/TestLedController.exe
build/TestLedController.exe
test/TestLedController.c:14:test_LedController_is_off_upon_creation:FAIL: Our greatest glory is not in never falling, but in rising every time we fall. - Confucius
Ok! So we have our first test! Confucius isn’t telling us anything useful anymore, let’s write a test that describes what the code is (or isn’t doing). For the rest of the code snippets, I’m going to only include the bits that change.
// test/TestLedController.c

#include <stdint.h>

void test_LedController_is_off_upon_creation(void)
{
	uint16_t virtualPin = 0xface;									[1]
  LedController_Create(&virtualPin);
  TEST_ASSERT_EQUAL_HEX16(0, virtualPin);
}
[1] I find it useful to put in recognizably nonsense numbers or strings in the data of my tests. It can help you catch your mistakes faster
gcc -lm -m32 build/unity.o build/TestLedController_Runner.o build/TestLedController.o -o build/TestLedController.exe
/usr/bin/ld: build/TestLedController.o: in function `test_LedController_is_off_upon_creation':
TestLedController.c:(.text+0x57): undefined reference to `LedController_Create'
Unity can’t find the function. Because we haven’t written it yet. So here’s our chance to finally make our code do something.
// src/LedController.c

#include "LedController.h"

void LedController_Create(uint16_t * address)
{
}
Which returns:
test/TestLedController.c:16:test_LedController_is_off_upon_creation:FAIL: Expected 0 Was 0xFACE

-----------------------
1 Tests 1 Failures 0 Ignored
FAIL
Ok! now let’s make it pass
// src/LedController.c

void LedController_Create(uint16_t * address)
{
	*address = 0;
}
So there it is, your first passing test on a teensy. Let’s keep going. This test will virtually turn on an Led
//test/TestLedController.c

void test_LedController_TurnOn_Led_seven(void)
{
  uint16_t virtualPin;
  LedController_Create(&virtualPin);
  LedController_TurnOn(7);
  TEST_ASSERT_EQUAL_HEX16(0x40, virtualPin);
}
Unity will complain that it doesn’t know about the new function, as it should.
test/TestLedController.c: In function ‘test_LedController_TurnOn_Led_seven’:
test/TestLedController.c:23:3: warning: implicit declaration of function ‘LedController_TurnOn’; did you mean ‘LedController_Create’? [-Wimplicit-function-declaration]
   23 |   LedController_TurnOn(7);
      |   ^~~~~~~~~~~~~~~~~~~~~~
      |   LedController_Create
A quick note about the function names, at first I was annoyed by developers putting the module name in the front of each method call. Over time though, I came to appreciate that it makes a big difference in keeping things organized. It might seem weird to readers coming from an object-oriented language but it does really help!
So next we add LedController_TurnOn() to the header file.
TestLedController.c:(.text+0xc6): undefined reference to `LedController_TurnOn'We’ve seen this before, time to edit the sourcefile. If you just add the empty function and run rake, it will fail. Good to see. You want to see the test failing the way you expect before you implement the desired functionality.
test/TestLedController.c:12:test_LedController_is_off_upon_creation:PASS
test/TestLedController.c:24:test_LedController_TurnOn_Led_seven:FAIL: Expected 1 Was 0

-----------------------
2 Tests 1 Failures 0 Ignored
FAIL
Ok, to achieve the desired functionality, we will make a pointer to the address and mark it static so it’s not accessible to outside callers. To turn it on, we will make an over-simplification. This is an example of the Agile principle of ‘selecting the simplest design that could possibly work’.
It’s ok (even encouraged) to oversimplify your solutions during TDD as it is expected to produce a more robust solution than trying to create the complete solution immediately. These kinds of small, steady, well-tested steps can sometimes help to avoid careless (or rushed) mistakes.
// src/LedController.c

static uint16_t * ledsAddress;

void LedController_Create(uint16_t * address)
{
	ledsAddress = address;
	*ledsAddress = 0;
}
void LedController_TurnOn(int ledNumber)
{
  *ledsAddress = ledNumber;
}
This should pass. Congratulations, you can now ‘virtually’ turn on your light.
test/TestLedController.c:12:test_LedController_is_off_upon_creation:PASS
test/TestLedController.c:19:test_LedDriver_TurnOn_Led_seven:PASS

-----------------------
2 Tests 0 Failures 0 Ignored
OK
Let’s also make sure we can turn one off. Just to say we can. Also to achieve the same level of function as the infamous ‘sample blinky’.
void test_LedController_TurnOff_Led_seven(void)
{
  uint16_t virtualPin;
  LedController_Create(&virtualPin);
  LedController_TurnOn(7);
  LedController_TurnOff(7);
  TEST_ASSERT_EQUAL_HEX16(0, virtualPin);
}
After adding the header definitions and empty functions. You should be at a failing test.
test/TestLedController.c:12:test_LedController_is_off_upon_creation:PASS
test/TestLedController.c:19:test_LedController_TurnOn_Led_seven:PASS
test/TestLedController.c:33:test_LedController_TurnOff_Led_seven:FAIL: Expected 0 Was 1

-----------------------
3 Tests 1 Failures 0 Ignored
FAIL
It passes by reversing the command in TurnOn().
void LedController_TurnOff(int ledNumber)
{
  *ledsAddress = 0;
}
commit 38d4ee4
So that brings us to our first refactoring opportunity. One of the ways codebases get out of hand over time is by writing the same instructions over and over in different parts of your code. Another of the important tenets of programming is Don’t Repeat Yourself which is apparently attributed to the writers of Pragmatic Programmer who also published Grenning’s book. You might say that I’ve drank the kool-aid when it comes to this testing stuff.
At any rate, keeping your code DRY means always being on the lookout for opportunities to bring together duplicated statements into a single definition. Many practitioners advocate for refactoring after the third duplication. In our case, we now have a statement that occurs in every test.
LedController_Create(&virtualPin);However, our test about of LedController_Create() involves a variable declaration beforehand. So we can’t remove it. That means we can only remove two of the duplicates but let’s take the opportunity to do it now anyway. This statement will be required consistenly in upcoming tests anyway so it won’t be two for long:
Here’s how TestLedController.c looks after refactoring
#include "unity.h"
#include "LedController.h"

static uint16_t virtualPin;

void setUp(void)
{
  LedController_Create(&virtualPin);
}

void tearDown(void)
{
}

void test_LedController_is_off_upon_creation(void)
{
  uint16_t virtualPin = 0xface;
  LedController_Create(&virtualPin);
  TEST_ASSERT_EQUAL_HEX16(0, virtualPin);
}

void test_LedController_TurnOn_Led_seven(void)
{
  LedController_TurnOn(7);
  TEST_ASSERT_EQUAL_HEX16(0x40, virtualPin);
}

void test_LedController_TurnOff_Led_seven(void)
{
  LedController_TurnOn(7);
  LedController_TurnOff(7);
  TEST_ASSERT_EQUAL_HEX16(0, virtualPin);
}
The tests are short and sweet. That makes a big difference as your codebase & test suite starts to grow. The faster you can understand what a newly failed test is doing, the more likely you are to identify and fix it quickly as well.
Start on green, end on green with refactoring
Sometimes it can be tempting to refactor out a duplication you find while doing some other task. Don’t do that. You always want a fully passing codebase before you start refactoring or you can get yourself into all kinds of confusing trouble.
Turning on a specific Led (& a point about binary)
Right now the driver will represents all possible pins in a single binary value. This is clearly not very useful on a board with multiple pins. In this case, the 16-bit variable ledsAddress represents 16 pins that represent whether its Led is on (1) or off (0). So, for example, the binary 0000001001000000 is equal to the hex value 0x240 which is equal to 576 on a decimal scale (the way we are accustomed to counting). There are lots of binary-hexadecimal-decimal converters available online to help.
Anyways, it’s time to start toggling different pins. Here’s the test:
//test/TestLedController.c

void test_LedController_TurnOn_MultipleLeds(void)
{
  LedController_TurnOn(10);
  LedController_TurnOn(7);
  TEST_ASSERT_EQUAL_HEX16(0x240, virtualPin);
}
The test returns 0x0001 instead of 0x0240, just like we’d coded it earlier.
test/TestLedController.c:15:test_LedController_is_off_upon_creation:PASS
test/TestLedController.c:22:test_LedController_TurnOn_Led_seven:PASS
test/TestLedController.c:28:test_LedController_TurnOff_Led_seven:PASS
test/TestLedController.c:39:test_LedController_TurnOn_MultipleLeds:FAIL: Expected 0x0180 Was 0x0001

-----------------------
4 Tests 1 Failures 0 Ignored
FAIL
Time to fix that with a technique called bit-shifting. This is important in embedded systems so get comfortable with it if you’re not already.
// src/LedController.c

void LedController_TurnOn(int ledNumber)
{
	*ledsAddress |= 1 << (ledNumber - 1);
}
Which will make your tests pass. So we can move onto the same case but for turning off a specific Led.
void test_LedController_TurnOff_AnLed(void)
{
  LedController_TurnOn(10);
  LedController_TurnOn(7);
  LedController_TurnOff(10);
  TEST_ASSERT_EQUAL_HEX16(0x40, virtualPin);
}
It fails with 0x0000 instead of the intended 0x0040. Again this is what we intentionally coded earlier. You’ll use a different bitwise operate to turn a specific bit to 0.
// src/LedController.c

void LedController_TurnOff(int ledNumber)
{
	*ledsAddress &= ~(1 << (ledNumber - 1));
}
Which brings everything to passing again. You could consider refactoring the bitshift into a function that is more expressive of the intention. Your future teammates will probably thank you for that. Make it static and keep it out of the header since there’s no reason an external call would need to use this function.
// src/LedController.c

static uint16_t getBitLocationFromLedNumber(int ledNumber)
{
	return 1 << (ledNumber - 1);
}

void LedController_TurnOn(int ledNumber)
{
	*ledsAddress |= getBitLocationFromLedNumber(ledNumber);
}

void LedController_TurnOff(int ledNumber)
{
	*ledsAddress &= ~(getBitLocationFromLedNumber(ledNumber));
}
There’s a bit of a nuance to what we’ve done here. The pins on a teensy can be set to either read or write. This means that a pin set to output (such as an LedController) cannot read the actual state of the pin. Instead it has to keep track of the values in its own separate memory location.
Why is this important? Well, it comes down to the difference between state and action. Many embedded systems will use finite state machines in order to carry out their tasks. If you look to the delay() function in main(), the processor is occupied during the delay and cannot be asked to do any other tasks. Using a state machine can help to free up system resources while still keeping track of the various peripherals (such as LEDs).
Let’s look and how to ensure monitoring of state with a test:
// test/LedController.c

void test_LedController_does_not_read_the_LedMemoryMap_for_state(void)
{
  virtualPin = 0xffff;
  LedController_TurnOn(8);
  TEST_ASSERT_EQUAL_HEX16(0x80, virtualPin);
}
Which fails by returning the memory mapped location declared in the test setup
test/TestLedController.c:54:test_LedController_does_not_read_the_LedMemoryMap_for_state:FAIL: Expected 0x0080 Was 0xFFFFnote: this particular Rakefile will only recognize functions that start with test_< WhateverModule >.c if you forget to add test_ at the front of the function, the test will not be run.
Here’s what the passing code looks like. I didn’t include the Turn_off() function but it works the same:
// src/LedController.c

static uint16_t ledsImage;
static uint16_t * ledsAddress;

void LedController_Create(uint16_t * address)
{
	ledsAddress = address;
	ledsImage = 0x0000;
	*ledsAddress = ledsImage;
}

void LedController_TurnOn(int ledNumber)
{
	ledsImage |= getBitLocationFromLedNumber(ledNumber);
	*ledsAddress = ledsImage;
}
Back to main.cpp
So now we have a tested LedDriver. But it doesn’t actually make any system calls yet. It’s also not being called by main.cpp. How do we fix that?
Before moving forward, double-check all is working correctly by plugging in the teensy and callrake clean and then RAKE_TARGET=teensy rake deploy, to make sure it is loading blinky properly. Since the test suite cleans up its objects after each build, rake is going to need to rebuild the teensy3 modules. It takes 10 to 15s on my computer.
first add in the new module to make sure it builds ok. The Rakefile should handle it without complaint.
// src/main.cpp
extern "C" {
#include "LedController.h"
  .
  rest
  .
  of
  .
  code
  .
}
Note: The extern "C" {} wrapper is important here or you will get a linker error when main.cpp tries to call those functions. NOTE: This kills our ability to use Serial.println() for debugging but we do still have GDB.
Moving the system calls from main into LedController
within main, there are 3 system calls:
pinMode(ledNumber, OUTPUT);which tells the teensy to treat this pin as an output.digitalWriteFast(ledNumber, HIGH);Which applies a high (3.3V) voltage to the pin, causing the connected LED to light.digitalWriteFast(ledNumber, LOW);Which applies 0 voltage to the pin, causing the connected LED to go dark.
let’s try moving the first call pinMode() to LedController.
LedController.c:
#include "LedController.h"
#include "Arduino.h"

//...
//static variables
//...

void LedController_Activate(int ledNumber)
{
  pinMode(ledNumber, OUTPUT);
}
main.cpp:
#include <Arduino.h>

extern "C" {
#include "LedController.h"
}

extern "C" int main(void)
{
    uint16_t activeLeds;
    LedController_Create(&activeLeds);
    int boardLed = 13;
    LedController_Activate(boardLed);
    // pinMode(ledNumber, OUTPUT);  // NOTE: this has been commented out

  while (1) {
    digitalWriteFast(boardLed, HIGH);
    delay(500);
    digitalWriteFast(boardLed, LOW);
    delay(500);
  }
}
Try deploying first with rake deploy_teensy. That works! What about the tests with rake?
gcc -lm -m32 build/unity.o build/LedController.o build/TestLedController_Runner.o build/TestLedController.o -o build/TestLedController.exe
/usr/bin/ld: build/LedController.o: in function `LedController_Activate':
LedController.c:(.text+0xa8): undefined reference to `pinMode'
collect2: error: ld returned 1 exit status
rake aborted!
Unity is looking for the pinMode() function which is buried in the teensy source code. The build handles that without complaint but Unity is set-up to only reference the files directly called by the test. You’ll notice that even if we #include "Arduino.h", the command will still fail because unity does not attempt to find functions buried in submodules.
The way to handle this is called a ‘link-time spy’. A spy is an alternative, test-only module that allows you to stub a function and give a canned response to it.
comment out pinMode() and #include "Arduino.h" so that they don’t bother you while setting up the Spy
What kind of behaviour might we expect from the Teensy? Well, it should be recognized but off if it’s activated. Something like this:
// test/TestLedController.c

void test_Unactivated_Led_will_return_LED_if_activated(void)
{
  LedController_Activate(10);
  TEST_ASSERT_EQUAL_HEX16(10, TeensySpy_GetLastId());
  TEST_ASSERT_EQUAL_HEX16(OUTPUT, TeensySpy_GetLastState());
}
Which will naturally fail if we run rake since those new functions are unrecognized. Comment out that test while we set-up the spy.
Ok, so now we will create a new folder called mocks where we will place the spy (and it’s tests).
// mocks/TestTeensySpy.c:

#include "unity.h"
#include "TeensySpy.h"

void setUp(void)
{
  TeensySpy_Create();
}

void tearDown(void)
{
}

void test_TeensySpy_on_create(void)
{
  TEST_ASSERT_EQUAL_HEX16(LED_ID_UNKNOWN, TeensySpy_GetLastId());
  TEST_ASSERT_EQUAL_HEX16(LED_STATE_UNKNOWN, TeensySpy_GetLastState());
}
Nothing fancy here, a simple Create function to get started. Then a couple functions to store the result that was passed: GetLastId and GetLastState.
Let’s see what those functions look like within TeensySpy.h
// mocks/TeensySpy.h

#ifndef D_TeensySpy_H
#define D_TeensySpy_H

#include <stdint.h>

enum
{
  LED_ID_UNKNOWN = -1, LED_STATE_UNKNOWN = -1
};

void TeensySpy_Create();

int TeensySpy_GetLastId(void);
int TeensySpy_GetLastState(void);

#endif
and then the source:
// mocks/TeesnySpy.c

#include "TeensySpy.h"

static int lastId;
static int lastState;

void TeensySpy_Create()
{
  lastId = LED_ID_UNKNOWN;
  lastState = LED_STATE_UNKNOWN;
}

int TeensySpy_GetLastId()
{
  return lastId;
}
int TeensySpy_GetLastState()
{
  return lastState;
}
Now we can start to ‘stub out’ the methods that are tucked away in Arduino.h. The one we are focusing on is pinMode() so let’s first create a test:
// mocks/TestTeensySpy.c
include "unity.h"
#include "TeensySpy.h"

void test_TeensySpy_set_pinMode_to_Output(void)
{
  pinMode(5, OUTPUT);
  TEST_ASSERT_EQUAL_HEX16(5, TeensySpy_GetLastId());
  TEST_ASSERT_EQUAL_HEX16(OUTPUT, TeensySpy_GetLastState());
}
and then add the function itself:
And then TeensySpy.c
enum
{
  LED_ID_UNKNOWN = -1, LED_STATE_UNKNOWN = -1 ,
  LIGHT_ON = 1,  LIGHT_OFF = 0,
  OUTPUT = 10                       [2]
};

void pinMode(int ledNumber, int command)
{
  lastId = ledNumber;
  lastState = command;
}

[2] These Symbols in the enums, make the tests more readable. Since they reside in the header file of the Spy, they remain unknown to the production code.
Make sure to add pinMode to the TeensySpy.h header file as well!
The tests should pass.
So if we turn our attention back to the LedController, we can now uncomment #include "Arduino.h" & pinMode(). This breaks the tests because there is no Arduino.h in the test environment.
If we create an empty header file:
// mocks/Arduino.h

#ifndef D_Arduino_H
#define D_Arduino_H
#endif
We end up with a new failure,
src/LedController.c:18:22: error: 'OUTPUT' undeclared (first use in this function)
   18 |   pinMode(ledNumber, OUTPUT);
That output enum comes from within the teensy library that we’ve stubbed out. So we can just add a simple enum to satisfy the linker:
// mocks/Arduino.h
enum
{
  OUTPUT = 10
};

void pinMode(uint8_t ledNumber,uint8_t io);
Give it a try with rake clean & RAKE_TARGET=teensy rake deploy
This is a good place to commit your work.
commit 25077e5
The LED should be blinking. From here we can extract the rest of the Led functions into LedController.
Here’s the while loop in main.cpp with the LedController calls added:
  // src/LedController.c

  while (1) {
    LedController_TurnOn(boardLed);
    delay(500);
    LedController_TurnOff(boardLed);
    delay(500);
  }
and the pin toggle functions added to LedController:
// src/LedController.c

void LedController_TurnOn(int ledNumber)
{
  ledsImage |= getBitLocationFromLedNumber(ledNumber);
  *ledsAddress = ledsImage;
  digitalWriteFast(ledNumber, HIGH);
}

void LedController_TurnOff(int ledNumber)
{
  ledsImage &= ~(getBitLocationFromLedNumber(ledNumber));
  *ledsAddress = ledsImage;
  digitalWriteFast(ledNumber, LOW);
}
Naturally, this breaks the tests. So let’s comment out the digitalWriteFast in LedController and then create some stubbed functions for digitalWriteFast(), within the spy. We’ll add the tests first of course.
There is an adage in TDD, ‘make it work for none, then make it work for one, then make it work for many’. What does that mean?
Well, our teensy wouldn’t allow us to toggle a pin on/off if it hadn’t already been set to output would it? So we shouldn’t allow our Spy to either. Here’s what that means in a test;
// test/TestTeensySpy.c

void test_TeensySpy_wont_respond_to_digitalWriteFast_if_no_pinMode_call(void)
{
  digitalWriteFast(5, HIGH);

  TEST_ASSERT_EQUAL_HEX16(LED_ID_UNKNOWN, TeensySpy_GetLastId());
  TEST_ASSERT_EQUAL_HEX16(LED_STATE_UNKNOWN, TeensySpy_GetLastState());
}

void test_TeensySpy_set_a_pin_to_HIGH(void)
{
  pinMode(8, OUTPUT);
  digitalWriteFast(8, HIGH);

  TEST_ASSERT_EQUAL_HEX16(8, TeensySpy_GetLastId());
  TEST_ASSERT_EQUAL_HEX16(HIGH, TeensySpy_GetLastState());
}
Here’s a simple if clause that’ll check if the pinMode(OUTPUT) was called for the correct pin, if not, the Spy resets its values, if yes, it proceeds with the digitalWriteFast function call.
// mocks/TeensySpy.c

void digitalWriteFast(int ledNumber, int LEVEL)
{
  if (lastId == ledNumber)
  {
    lastState = LEVEL;
  } else
  {
    lastId = LED_ID_UNKNOWN;
      lastState = LED_STATE_UNKNOWN;
  }
}
We’ll need to add the HIGH and LOW definitions to our mock Arduino header. The complete file will look like this:
#ifndef D_Arduino_H
#define D_Arduino_H

#include <stdint.h>

enum
{
  LOW = 0, HIGH = 1, OUTPUT = 10
};

void pinMode(uint8_t ledNumber,uint8_t io);
void digitalWriteFast(uint8_t ledNumber, uint8_t level);

#endif
The compiler will now complain that OUTPUT has been declared twice since it’s already in TeensySpy.h. We can resolve that by removing it OUTPUT from the spy. Now TestTeensySpy will complain because that function is now missing. That is resolved by adding #include "Arduino.h" to & TestTeensySpy & TestLedController.
All tests passing? A similar test can/should be written for setting digitalWriteFast(LOW), since it doesn’t require a change to the logic, it’s good practice to change the code slightly to make the test fail. For example:
void digitalWriteFast(int ledNumber, int LEVEL)
{
  if (lastId == ledNumber)
  {
    lastState = LEVEL + 1;
  } else

  .
  .
  .
will cause the last 2 tests to fail like this
test/TestTeensySpy.c:13:test_TeensySpy_on_create:PASS
test/TestTeensySpy.c:19:test_TeensySpy_set_pinMode_to_Output:PASS
test/TestTeensySpy.c:26:test_TeensySpy_wont_respond_to_digitalWriteFast_if_no_pinMode_call:PASS
test/TestTeensySpy.c:41:test_TeensySpy_set_a_pin_to_HIGH:FAIL: Expected 0x0001 Was 0x0002
test/TestTeensySpy.c:50:test_TeensySpy_set_a_pin_to_LOW:FAIL: Expected 0x0000 Was 0x0001
So the tests are indeed checking that the code produces the expected result. Great! Remove the ‘+ 1’ and lets get back to LedController.
At that point, the tests should pass and rake deploy_teensy also succeeds.
This is a good time to commit your work.
git add -A
git commit -am "finish extracting led functions into LedController"
So now if you uncomment the digitalWriteFast() calls, the led blinks and the tests pass.
commit 146254c
Extracting time functions
So where are we at now?
if we look at main.cpp, we see that there is still a function call to the Arduino.h library
  while (1) {
    LedController_TurnOn(boardLed);
    delay(500);
    LedController_TurnOff(boardLed);
    delay(500);
  }
the delay(milliseconds) function causes the board to freeze for the specified time in milliseconds. Scheduling and timing is a very important function in micro-controllers that are constantly switching between different tasks on specified intervals.
But that poses certain special challenges for testing. For example. If you had a task that only repeats once a day, are you going to wait around for that time? What if you need to support daylight savings time or leap years? Clearly you need a way to control the internal clock of the device from your test harness. Grenning’s book used a scheduler to accomplish this. We are going to mimic this approach although it is arguably overkill to just replace a simple delay function.
Let’s get started.
The Scheduler
So the way this is going to work, is that main() will start a module called LightScheduler and give it the variables necessary to function. The LightScheduler will then constantly check the time via callbacks. When the reported time matches the desired time, LedScheduler will call LedController to toggle the desired pin.
Let’s use a test to show the different components/function calls.
//test/TestLedScheduler.c

#include "unity.h"
#include "LedScheduler.h"

void test_LedScheduler_ScheduledDelay_didnt_arrive_yet(void)
{
  LedScheduler_ScheduleDelay(10, 500);
  FakeTimeService_SetMilliseconds(499);
  LedScheduler_WakeUp();

  TEST_ASSERT_EQUAL_HEX16(LED_ID_UNKNOWN, LedControllerSpy_GetLastId());
  TEST_ASSERT_EQUAL_HEX16(LED_STATE_UNKNOWN, LedControllerSpy_GetLastState());
}
What the test is saying is that our LedScheduler will create a delay of 500ms, then we will use a fake timer to advance to just before the delay (499ms), and confirm that LedScheduler didnt turn on any Leds yet.
We will create an LedControllerSpy to watch for the calls of LedScheduler. It will be quite similar to the TeensySpy we implemented for the LedController tests.
This is too much functionality to implement all at once though so we will just comment it out and hold onto it as a reference for now.
Even still, we’ll need to add an empty header to make sure the test suite still compiles:
// includes/LedScheduler.h

#ifndef D_LedScheduler_H
#define D_LedScheduler_H

#endif
Here’s a much simpler test to get started with. It requires us to setup a new spy which we’ll call LedControllerSpy:
// test/TestLedScheduler.c

#include "LedControllerSpy.h"

static uint16_t * virtualPin;

void test_LedScheduler_No_Lights_On_Initialization(void)
{
  LedController_Create(virtualPin);
  TEST_ASSERT_EQUAL_HEX16(LED_ID_UNKNOWN, LedControllerSpy_GetLastId());
  TEST_ASSERT_EQUAL_HEX16(LED_STATE_UNKNOWN, LedControllerSpy_GetLastState());
}
We’ll also comment that out and now start out with a test of the LedControllerSpy itself. It’s going to be quite similar to TeensySpy that we wrote earlier.
// mocks/TestLedControllerSpy.c

#include "unity.h"
#include "LedControllerSpy.h"

void test_LedControllerSpy_on_create(void)
{
  LedController_Create();
  TEST_ASSERT_EQUAL_HEX16(LED_ID_UNKNOWN, LedControllerSpy_GetLastId());
  TEST_ASSERT_EQUAL_HEX16(LED_STATE_UNKNOWN, LedControllerSpy_GetLastState());
}
Which is satisfied by the following header:
// mocks/LedControllerSpy.h

#ifndef D_LedControllerSpy_H
#define D_LedControllerSpy_H

#include <stdint.h>
#include "LedController.h"

enum
{
  LED_ID_UNKNOWN = -1, LED_STATE_UNKNOWN = -1,
  LED_OFF = 0, LED_ON = 1
};

void LedControllerSpy_Create(uint16_t * ledsAddress);
int LedControllerSpy_GetLastId(void);
int LedControllerSpy_GetLastState(void);

#endif
and sourcefile:
// mocks/LedControllerSpy.c

#include "LedControllerSpy.h"

static int lastId;
static int lastState;

void LedController_Create(uint16_t * ledsAddress)
{
  lastId = LED_ID_UNKNOWN;
  lastState = LED_STATE_UNKNOWN;
}

int LedControllerSpy_GetLastId(void)
{
    return lastId;
}

int LedControllerSpy_GetLastState(void)
{
  return lastState;
}
So now if we uncomment the test within testLedScheduler.c we get a failure:
test/TestLedScheduler.c:26:test_LedScheduler_No_Lights_On_Initialization:
FAIL: Expected 0xFFFF Was 0x0000
We can solve that by creating the spy in the test setUp
// mocks/TestLedControllerSpy.c

static uint16_t * ledsAddress;

void setUp(void)
{
  LedController_Create(address);
}
Great! Now let’s turn on a light.
//mocks/TestLedControllerSpy.c

void test_LedControllerSpy_remembers_light_after_TurnOn(void)
{
  LedController_TurnOn(10);
  TEST_ASSERT_EQUAL_HEX16(10, LedControllerSpy_GetLastId());
  TEST_ASSERT_EQUAL_HEX16(LED_ON, LedControllerSpy_GetLastState());
}
And make it pass by adding the function to LedControllerSpy. Note we don’t need to add it to the header file since it is already defined in LedController.h which is #included in LedControllerSpy.h. This makes sure that the real functions being called by our spy is consistent with the production code.
The test to test for turning an Led off is identical so I won’t repeat it here but you should definitiely write it! We can now move on to the time aspect of our still commented test in LedSchedulerTest.
commit 0a032ac
Faking Time
Depending on your application, time management may be hugely important and embedded systems face all sorts of challenges with handling time. For our tests, we need to be able to fake the time on our board to create all of the different hypothetical situations we might need it to respond to.
In our little example here, we just need to make sure that LedScheduler correctly implements the delay function. So we need to fake that delay. We’ll start by adding the tests to mocks/FakeTimeServiceTest.c.
// mocks/TestFakeTimeService.c

#include "unity.h"
#include "FakeTimeService.h"

void setUp(void)
{
  TimeService_Create();
}

void test_FakeTimeService_on_create(void)
{
  Time time;
  TimeService_GetTime(&time);
  TEST_ASSERT_EQUAL_HEX16(MILLISECONDS_UNKNOWN, time.milliseconds);
}

void test_FakeTimeService_sets_time(void)
{
  Time time;
  FakeTimeService_SetMilliseconds(77);
  TimeService_GetTime(&time);
  TEST_ASSERT_EQUAL_HEX16(77, time.milliseconds);
}
The header FakeTimeService.h will look like this:
// mocks/FakeTimeService.h

#ifndef D_FakeTimeService_H
#define D_FakeTimeService_H

#include "TimeService.h"

void FakeTimeService_SetMilliseconds(int);

enum {MILLISECONDS_UNKNOWN = -1 };

#endif
Which will fail because it can’t find TimeService.h. The real TimeService.c is where we will put our teensy specific delay function a little later. But we will need to create the header now:
// includes/TimeService.h

#ifndef D_TimeService_H
#define D_TimeService_H

typedef struct Time Time;

struct Time
{
    int milliseconds;
};

void TimeService_GetTime(Time * );

void TimeService_Create(void);
void TimeService_Destroy(void);

#endif
Using typedefs & structs in c is something that I’m still getting a hang of but using it for our Time abstraction is helpful since it allows us to add other types of time that might be relevant to the system at a later date (day, minute, etc). However, all we need right now is milliseconds so this header might seem a little overkill.
This is the passing code:
// mocks/FakeTimeService.c

#include "FakeTimeService.h"

static Time fakeTime;

void TimeService_Create(void)
{
    fakeTime.milliseconds = MILLISECONDS_UNKNOWN;
}

void TimeService_Destroy(void)
{
}

void TimeService_GetTime(Time * time)
{
    time->milliseconds = fakeTime.milliseconds;
}

void FakeTimeService_SetMilliseconds(int milliseconds)
{
  fakeTime.milliseconds = milliseconds;
}
Tests pass, sweet, now we can move back to the TestLedScheduler. Using the ‘make it work for none, then one, then many’ methodology, we will gradually add the scheduling, test by test
// mocks/TestLedScheduler.c

#include "FakeTimeService.h" //add this to the top

void test_LedScheduler_No_Schedule_No_Action_Taken(void)
{
  FakeTimeService_SetMilliseconds(365);
  LedScheduler_WakeUp();
  TEST_ASSERT_EQUAL_HEX16(LED_ID_UNKNOWN, LedControllerSpy_GetLastId());
  TEST_ASSERT_EQUAL_HEX16(LED_STATE_UNKNOWN, LedControllerSpy_GetLastState());
}
we’ll need to add LedScheduler_WakeUp(); to the LedScheduler.h and just an empty function in src/LedScheduler.c will be sufficient to make the test pass.
// src/LedScheduler.c

#include "LedScheduler.h"

void LedScheduler_WakeUp(void)
{
}
From here we are finally ready to uncomment the test from the beginning of this section. Here it is again:
// test/TestLedScheduler.c

void test_LedScheduler_ScheduledDelay_didnt_arrive_yet(void)
{
  LedScheduler_ScheduleDelay(10, 500);
  FakeTimeService_SetMilliseconds(499);
  LedScheduler_WakeUp();

  TEST_ASSERT_EQUAL_HEX16(LED_ID_UNKNOWN, LedControllerSpy_GetLastId());
  TEST_ASSERT_EQUAL_HEX16(LED_STATE_UNKNOWN, LedControllerSpy_GetLastState());
}
Again, an empty function will cause the test to pass:
void LedScheduler_ScheduleDelay(int id, int milliseconds)
{
}
And now, finally, we hit the point where we can turn on the Led:
// test/TestLedScheduler.c
void test_LedScheduler_ScheduledDelay_just_arrived(void)
{
  LedScheduler_ScheduleDelay(4, 500);
  FakeTimeService_SetMilliseconds(500);
  LedScheduler_WakeUp();

  TEST_ASSERT_EQUAL_HEX16(4, LedControllerSpy_GetLastId());
  TEST_ASSERT_EQUAL_HEX16(LED_ON, LedControllerSpy_GetLastState());
}
Sure enough, it fails:
test/TestLedScheduler.c:50:test_LedScheduler_ScheduledDelay_just_arrived:FAIL: Expected 0x0004 Was 0xFFFF

-----------------------
4 Tests 1 Failures 0 Ignored
FAIL
Like we did with Time, we are going to use a typedef struct to house the information of the scheduled event. This will allow us to create multiple scheduled events and easily add extra parameters later if necessary. Here’s how it looks:
// src/LedScheduler.c

#include <stdint.h>

#include "TimeService.h"
#include "LedScheduler.h"
#include "LedController.h"

typedef struct
{
  int id;
  int milliseconds;
} ScheduledLedEvent;

static ScheduledLedEvent scheduledEvent;

void LedScheduler_ScheduleDelay(int id, int milliseconds)
{
  scheduledEvent.id = id;
  scheduledEvent.milliseconds = milliseconds;
}

void LedScheduler_WakeUp(void)
{
  Time time;
  TimeService_GetTime(&time);

  if (time.milliseconds < scheduledEvent.milliseconds)
  {
    return;
  }
  LedController_TurnOn(scheduledEvent.id);
}
This triggers a new failure in a previous test:
test/TestLedScheduler.c:19:test_LedScheduler_No_Schedule_No_Action_Taken:FAIL: Expected 0xFFFF Was 0x0000Our tests have caught another bug for us. This is why we write them! We need to initialize LedScheduler in an unused state and add a guard to check if a ScheduledEvent has been created.
First add a Create function to the test setUp and header:
// test/TestLedScheduler.c

void setUp(void)
{
  LedScheduler_Create();
  LedControllerSpy_Create();
}
Then add the function and test to LedScheduler:
// src/LedScheduler.c

enum
{
    UNUSED = -1
};
.
.
.
void LedScheduler_Create(void)
{
  scheduledEvent.id = UNUSED;
}
.
.
.
void LedScheduler_WakeUp(void)
{
  Time time;
  TimeService_GetTime(&time);

  if (scheduledEvent.id == UNUSED)
  {
    return;
  }
  if (time.milliseconds < scheduledEvent.milliseconds)
  {
    return;
  }
  LedController_TurnOn(scheduledEvent.id);
}
Which passes. So we are now calling TimeService and comparing the value to our specified delay in order to trigger the Led.
Let’s add a test for TurnOff for good measure:
// test/TestLedScheuduler.c

void test_LedScheduler_ScheduledDelay_just_arrived_Led_is_on(void)
{
  LedController_TurnOn(4);
  LedScheduler_ScheduleDelay(4, 500);
  FakeTimeService_SetMilliseconds(500);
  LedScheduler_WakeUp();

  TEST_ASSERT_EQUAL_HEX16(4, LedControllerSpy_GetLastId());
  TEST_ASSERT_EQUAL_HEX16(LED_OFF, LedControllerSpy_GetLastState());
}
To make this pass is a matter of checking whether the Led is on or off.
// src/LedScheduler.c

if (LedController_IsOn(scheduledEvent.id))
{
  LedController_TurnOff(scheduledEvent.id);
} else {
  LedController_TurnOn(scheduledEvent.id);
}
Since this is a new function for LedController, we’ll first write a test for it. This requires adding a test to and passing method to TestLedController:
// test/TestLedController.c

void test_LedController_knows_if_an_Led_is_On(void)
{
  LedController_TurnOn(8);
  TEST_ASSERT(LedController_IsOn(8));
  TEST_ASSERT_FALSE(LedController_IsOn(10));
}
Here’s The passing code for that test:
// src/LedController.c

BOOL LedController_IsOn(int ledNumber)
{
  if ((*ledsAddress & getBitLocationFromLedNumber(ledNumber)) >> (ledNumber -1))
  {
    return TRUE;
  } else {
    return FALSE;
  }
}
Note: We’ve added some constants, BOOL, TRUE, FALSE, that don’t exist in the standard libraries but can make C a bit easier to read. To incorporate these constant, we can create a new includes common.h with the following. It will need to be included in LedController.h
// includes/common.h

#ifndef D_Common_H
#define D_Common_H

#ifndef BOOL
#define BOOL int
#endif

#ifndef TRUE
#define TRUE 1
#endif

#ifndef FALSE
#define FALSE 0
#endif

#endif
Ok, back to LedScheduler. Hmmm it has an error.
gcc -lm -m32 build/objs/TestLedScheduler.o build/objs/TestLedScheduler_Runner.o build/objs/unity.o build/objs/LedScheduler.o build/objs/LedControllerSpy.o build/objs/FakeTimeService.o  -o build/TestLedScheduler.exe  -lm
/usr/bin/ld: build/objs/LedScheduler.o: in function **LedScheduler_WakeUp**:
LedScheduler.c:(.text+0xab): undefined reference to `LedController_IsOn'
collect2: error: ld returned 1 exit status
rake aborted!
ABORT RakefileHelper error: error during linking
We usually see this when a function hasn’t been added yet. What caused this issue?
Well, this is an opportunity to explain a concept that took me ages to wrap my head around: the way the Unity uses the gcc linker to prepare the test files. Let’s look at the gcc call that triggered the failure:
gcc -lm -m32 build/objs/TestLedScheduler.o
build/objs/TestLedScheduler_Runner.o
build/objs/unity.o
build/objs/LedScheduler.o
build/objs/LedControllerSpy.o
build/objs/FakeTimeService.o
-o build/TestLedScheduler.exe  -lm
each of the files starting with build/objs will get linked together in order to run the test. So what’s the issue? Well, we just edited LedController.c which isn’t mentioned in that list. What we actually needed to do was adjust LedControllerSpy.c in order to get the test passing.
I jumped the gun a bit. But since I wrote a test before implementing the function, it should still be safe. Let’s adjust the spy now. We can get away with cruder logic here (don’t forget to #include "common.h").
// mocks/LedControllerSpy.c

BOOL LedController_IsOn(int ledNumber)
{
  if (lastId == ledNumber & lastState == LED_ON)
  {
    return TRUE;
  } else {
    return FALSE;
  }
}
And with that, we are back to passing tests! We could keep going and add logic to incorporate additional ScheduledEvents, but that’s not necessary for us just to replace Teensy’s delay function. So we’re gonna move on from here.
commit 3a1312b
Hooking LedScheduler into the Teensy
Ok, so now we are ready to actually displace the delay call. How shall we start? First let’s convince ourselve we haven’t broken anything (yet) with a
rake clean && RAKE_TARGET=teensy rake deploy
Still flashing? On we go.
As mentioned above, we are going to move delay() into a newly created TimeService.cpp. Like this:
First, we’ll add #include "Arduino.h".
//src/TimeService.cpp

#include "TimeService.h"
#include "Arduino.h"

static void _cpp_delay(int milliseconds)
{
  delay(milliseconds);
}

extern "C" {
  void TimeService_Delay(int milliseconds)
  {
    _cpp_delay(milliseconds);
  }
}
NOTE: Since delay() is a .cpp function, it needs to be called from within a cpp file. However, LedScheduler.c will only recognize function defintions declared from within an extern "C" wrapper. Going forward, anything calling functions or types from the teensy library should be called from outside the extern "C" wrapper. Anything called from our own .c files should be inside the wrapper.
From there, we can move the looping logic from main.cpp, into LedScheduler like so:
// src/main.cpp

extern "C" {
  #include "LedController.h"
  #include "LedScheduler.h"
  #include "TimeService.h"

  int main(void)
  {
    uint16_t activeLeds;
    LedController_Create(&activeLeds);
    LedScheduler_Create();

    int boardLed = 13;
    int delay = 500;
    LedController_Activate(boardLed);
    LedScheduler_ScheduleDelay(boardLed, delay);

    while (1) {
      LedScheduler_WakeUp();
    }
  }
}
What’s more, we’ve now removed all of the cpp function calls from main. If you follow Jack Ganssle of the Embedded Muse, you will probably read multiple criticisms about using cpp in embedded sysems.
Im not going to try to wade into that argument as I still have a lot to learn just in C.
So now we are going to refactor it into a .c file.
// src/main.c  *RENAMED*

#include "LedController.h"
#include "LedScheduler.h"

int main(void)
{
  uint16_t activeLeds;
  LedController_Create(&activeLeds);
  LedScheduler_Create();

  int boardLed = 13;
  int delay = 500;
  LedController_Activate(boardLed);
  LedScheduler_ScheduleDelay(boardLed, delay);

  while (1) {
    LedScheduler_WakeUp();
  }
}
Next, we’ll briefly add TimeService_Delay() into LedScheduler_WakeUp(). This is a temporary measure just to convince ourselves that we can deploy to the teensy. We’ll comment out all of the logic which involves time checking:
// src/LedScheduler.c

void LedScheduler_WakeUp(void)
{
  // Time time;
  // TimeService_GetTime(&time);

  // if (scheduledEvent.id == UNUSED)
  // {
  //  return;
  // }
  // if (time.milliseconds != scheduledEvent.milliseconds)
  // {
  //  return;
  // }

  if (LedController_IsOn(scheduledEvent.id))
  {
    LedController_TurnOff(scheduledEvent.id);
  } else {
    LedController_TurnOn(scheduledEvent.id);
  }

  TimeService_Delay(scheduledEvent.milliseconds);
}
Finally, we’ll also need to add header guards to TimeServce.h to or the compiler will get confused that sometimes it is being included in the compilation of a C file and other times for a C++ file
#ifdef __cplusplus
extern "C" {
#endif

    typedef struct Time Time;

    struct Time
    {
        int milliseconds;
    };

    void TimeService_Delay(int milliseconds);
    void TimeService_GetTime(Time * );
    void TimeService_Create(void);
    void TimeService_Destroy(void);

#ifdef __cplusplus
}
#endif
With that, you should have blinky fully functioning within the modules. But what about the tests?
/usr/bin/ld: build/objs/LedScheduler.o: in function `LedScheduler_WakeUp':
LedScheduler.c:(.text+0xb5): undefined reference to `TimeService_Delay'
So we need to add a stub in the FakeTimeService for TimeService_Delay(). An empty function is fine since we aren’t actually calling it within our tests. From here, a couple of our tests fail because of the commented out code.
At this point, we can begin implementing the actual functions in TimeService. What should our first test look like?
// test/TestTimeService.c

#include "unity.h"
#include "TimeService.h"
#include "TeensySpy.h"

void setUp(void)
{
  TeensySpy_Create();
}

void test_TimeService_GetTime_0_on_init(void)
{
  Time time;
  TimeService_GetTime(&time);
  TEST_ASSERT_EQUAL_HEX16(0, time.milliseconds);
}
Which initially fails because there is no delay() function within the scope of this test (ie the 2 headers we’ve declared: Timeservice.h and TeensySpy.c.
We could add delay() to our mock header mocks/Arduino.h. But that would reuire us to also generate a fake or mock delay function.
It’s not obvious to me how to write a test for it and delay() is not a great function to use anyways since your board isn’t able to do anything else while delay is executing.
So with that in mind, we are actually going to discard delay() from here in favour of ElapsedMillis which you can read more about if you’d like.
On that note, go ahead and comment out delay now. While you are at it, add #include <stdint.h> to mocks/Arduino.h since TimeService.cpp will otherwise get it from the teensy library`
// src/TimeService.cpp

void TimeService_Delay(int milliseconds)
{
  // delay(milliseconds);
}
From here, we end up with a missing function in TimeService:
TestTimeService.c:(.text+0x43): undefined reference to `TimeService_GetTime`We already have the function prototype in TimeService.h so we can just copy it in as an empty function to get past this error.
test/TestTimeService.c:18:test_TimeService_GetTime_0_on_init:FAIL: Expected 0x0000 Was 0x9488So we need to stub in the behaviour via TeensySpy.
For now, let’s comment out that test and drop one level down the stack to TestTeensySpy to add a couple stubs and tests.
// mocks/TestTeensySpy.c

void test_TeensySpy_stubs_0_elapsedMillis_on_init(void)
{
  TEST_ASSERT_EQUAL_HEX16(0, TeensySpy_GetElapsedMillis());
}
To get this passing, we’ll need to declare and initialize our stubbed elapsedMillis (named timeCounter);
// mocks/TeensySpy.c

static int lastId;
static int lastState;
static elapsedMillis timeCounter;

void TeensySpy_Create()
{
  lastId = LED_ID_UNKNOWN;
  lastState = LED_STATE_UNKNOWN;
  timeCounter = 0;
}

elapsedMillis TeensySpy_GetElapsedMillis(void)
{
  return timeCounter;
}
What is elapsedMillis? Well, if we look in the teensy supplied source files, namely teensy3/elapsedMillis.h, we’ll see a class that is only defined if compiled using C++. That’s an implementation detail we need to be aware of, but the other important item we need is the unsigned long type. The real elapsedMillis provides a rich functionality but for our purposes right now, we just need to declare our own elapsedMillis type within our mock header
// mocks/Arduino.h

typedef unsigned long elapsedMillis;
After adding #include "Arduino.h" to TeensySpy.h (which will allow us to remove the call to <stdint.h>, by the way), this should pass. Now let’s create the ability to advance & reset elapsedMillis within the spy:
// mocks/TestTeensySpy.c

void test_TeensySpy_stubs_can_advance_elapsedMillis(void)
{
  TeensySpy_AdvanceElapsedMillis(50);
  TEST_ASSERT_EQUAL_HEX16(50, TeensySpy_GetElapsedMillis());
}

void test_TeensySpy_stubs_can_reset_elapsedMillis(void)
{
  TeensySpy_AdvanceElapsedMillis(50);
  TeensySpy_ResetElapsedMillis();
  TEST_ASSERT_EQUAL_HEX16(0, TeensySpy_GetElapsedMillis());
}
which passes with the following:
// mocks/TeensySpy.c

elapsedMillis TeensySpy_AdvanceElapsedMillis(int milliseconds)
{
  timeCounter += milliseconds;
}

void TeensySpy_ResetElapsedMillis(void)
{
  timeCounter = 0;
}
From here, we can turn our attention back to TestTimeService which is still failing, TimeService_GetTime() needs to call on elapsedMillis
// src/TimeService.cpp

elapsedMillis timeCounter;

extern "C" {
  .
  .
  .

  void TimeService_GetTime(Time * time)
  {
    time->milliseconds = timeCounter;
  }
}
Which gives us a passing test (though we still have 2 failing in TestLedScheduler, we’ll get there soon. How about if we advance the stubbed time?
//test/TestTimeService.c

void test_TimeService_GetTime_after_advancing_spy(void)
{
  Time time;
  TeensySpy_AdvanceElapsedMillis(85);
  TimeService_GetTime(&time);
  TEST_ASSERT_EQUAL_HEX16(85, time.milliseconds);
}
It fails with no result.
test/TestTimeService.c:26:test_TimeService_GetTime_after_advancing_spy:FAIL: Expected 0x0055 Was 0x0000TimeService is not seeing the timeCounter that is being produced by TeensySpy. We’ll need to move the declaration into the TeensySpy.h header file in order for it to be visible to external caller modules.
// mocks/TeensySpy.h

#ifndef D_TeensySpy_H
#define D_TeensySpy_H

#include "Arduino.h"

elapsedMillis timeCounter;- GOTCHA: When I attempted this tutorial on ArchLinux, I suddenly got hung up on this step for a couple solid days on a multiple definition error. ArchLinux uses GCC 11 while Linux Mint (the distro I originally wrote this on uses GCC 9.
Turns our that declaring timeCounter in both TimeService and TeensySpy passes the default GCC linker options in Mint but not Arch. I don’t know about MingW/Windows or other distros.
The error is cleared by adding the linker flag
z muldefsto target_testing.yml like this:
linker:
  options:
    - lm
    - m32
- z muldefs- NOTE: Preventing multiple definitions appears to be more up to date with best practices. So it seems as though I should indeed by using stubbed functions via a mocked mocks/Arduino.c (rather than using TeensySpy to change the time during testing. I may pursue this route in a future revision after I’ve done some more research.
And with that, both TimeService tests are passing. We can also uncomment the logic within LedScheduler_WakeUp() to get those tests passing again.
Do we dare uncomment the tested code? Run rake clean && rake deploy_teensy first to make sure your blinky is still running and deploying. Then let’s go for it:
// src/LedScheduler.c

void LedScheduler_WakeUp(void)
{
  Time time;
  TimeService_GetTime(&time);
  if (scheduledEvent.id == UNUSED)
  {
    return;
  }
  if (time.milliseconds != scheduledEvent.milliseconds)
  {
    return;
  }
  if (LedController_IsOn(scheduledEvent.id))
  {
    LedController_TurnOff(scheduledEvent.id);
  } else {
    LedController_TurnOn(scheduledEvent.id);
  }
  // TimeService_Delay(scheduledEvent.milliseconds);
}
It waits the proper delay time, flashes on and then stays on. How about the tests? They are compiling and passing. So what’s the deal with the flashing?
Well, the callback is working correctly, but it’s not being reset after triggering the toggle switch. That’s an easy fix, here’s a test:
// test/TestTimeService.c

void test_TimeService_Reset_sets_timeCounter_back_to_0(void)
{
   TeensySpy_AdvanceElapsedMillis(12);
   TimeService_Reset();
   TEST_ASSERT_EQUAL_HEX16(0, TeensySpy_GetElapsedMillis());
}
Which we can make pass by adding the following to TimeService.cpp
  void TimeService_Reset()
  {
    timeCounter = 0;
  }
If we now replace the commented out TimeService_Delay() with our TimeService_Reset(), then we are back to blinky again!
We will need to stub a TimeService_Reset() call into FakeTimeService in order to get our test suite fully passing. It can be empty since we aren’t changing any functionality with this.
commit 2bbd6b0
So there we have it. A blinky program for Teensy via TDD.
Hope you feel that the effort was worth it. Testing can be a thankless pursuit in a development effort when timelines and budgets are tight. The up front effort can make a big difference in keeping a codebase clean and well structured. Making later changes less painful.
In the next article, we’ll add a second board from a different vendor and see how we can further abstract the interface to handle both.
Happy prototyping!!


Leave a comment